Friday, March 26, 2021
Wednesday, March 4, 2020
Oracle Database 19c Installation on Oracle Linux 7
Pre-installation settings before installing Oracle
Database 19c
SELinux
If the OS is to be
used for an Oracle installation, it is easier if Secure Linux (SELinux) is
disabled or switched to permissive. To do this edit the
"/etc/selinux/config" file, making sure the SELINUX flag is set as
follows.
# vi
/etc/selinux/config
SELINUX=permissive
If SELinux is
configured after installation, the server will need a reboot for the change to
take effect.
Firewall
If the OS is to be
used for an Oracle installation, it is easier if the firewall is disabled. This
can be done by issuing the following commands from a terminal window as the
"root" user.
# systemctl stop
firewalld
# systemctl disable
firewalld
You can install and
configure it later if you wish.
SSH
Make sure the SSH
daemon is started using the following commands.
# systemctl start
sshd.service
# systemctl enable
sshd.service
Hosts File
The
"/etc/hosts" file must contain a fully qualified name for the server.
127.0.0.1 localhost localhost.localdomain
localhost4 localhost4.localdomain4
192.168.174.162
oracle19c
Set the correct hostname in the "/etc/hostname" file.
oracle19c
Oracle Installation Prerequisites
Automatic Setup:
Install
"oracle-database-preinstall-19c" package to perform all prerequisite
setup. use the following command
# yum install -y https://yum.oracle.com/repo/OracleLinux/OL7/latest/x86_64/getPackage/oracle-database-preinstall-19c-1.0-1.el7.x86_64.rpm
# yum install -y
oracle-database-preinstall-19c
Manual Setup:
If you have not used
the "oracle-database-preinstall-19c" package to perform all
prerequisites, you have to manually perform the following setup tasks.
The following
packages are listed as required. Don't worry if some don't install. It won't
prevent the installation.
#basic packages to
install
yum install -y bc
yum install -y
binutils
yum install -y
compat-libcap1
yum install -y
compat-libstdc++-33
yum install -y
elfutils-libelf
yum install -y
elfutils-libelf-devel
yum install -y
fontconfig-devel
yum install -y glibc
yum install -y
glibc-devel
yum install -y ksh
yum install -y
libaio
yum install -y
libaio-devel
yum install -y
libdtrace-ctf-devel
yum install -y
libXrender
yum install -y
libXrender-devel
yum install -y
libX11
yum install -y
libXau
yum install -y libXi
yum install -y
libXtst
yum install -y
libgcc
yum install -y
librdmacm-devel
yum install -y
libstdc++
yum install -y
libstdc++-devel
yum install -y
libxcb
yum install -y make
yum install -y
smartmontools
yum install -y
sysstat
#following 4 not
available in oel8
yum install -y
dtrace-modules
yum install -y
dtrace-modules-headers
yum install -y
dtrace-modules-provider-headers
yum install -y
dtrace-utils
#(for Oracle RAC and
Oracle Clusterware)
yum install -y
net-tools
#(for Oracle ACFS)
yum install -y
nfs-utils
#(for Oracle ACFS
Remote)
yum install -y
python
yum install -y
python-configshell
yum install -y
python-rtslib
yum install -y
python-six
yum install -y
targetcli
yum install libstdc*
-y
yum install gcc -y
yum install gcc-c++
-y
yum install
java-11-openjdk-devel
Add the following lines to the
"/etc/sysctl.conf" file, or in a file called
"/etc/sysctl.d/98-oracle.conf".
# vi
/etc/sysctl.conf
fs.file-max =
6815744
kernel.sem = 250
32000 100 128
kernel.shmmni = 4096
kernel.shmall =
1073741824
kernel.shmmax =
4398046511104
kernel.panic_on_oops
= 1
net.core.rmem_default
= 262144
net.core.rmem_max =
4194304
net.core.wmem_default
= 262144
net.core.wmem_max =
1048576
net.ipv4.conf.all.rp_filter
= 2
net.ipv4.conf.default.rp_filter
= 2
fs.aio-max-nr =
1048576
net.ipv4.ip_local_port_range
= 9000 65500
Run one of the following commands to change the
current kernel parameters, depending on which file you edited.
/sbin/sysctl -p
# Or
/sbin/sysctl -p
/etc/sysctl.d/98-oracle.conf
Add the following lines to a file called
"/etc/security/limits.d/oracle-database-preinstall-19c.conf" file.
# vi
/etc/security/limits.d/oracle-database-preinstall-19c.conf
oracle soft
nofile 1024
oracle hard
nofile 65536
oracle soft
nproc 16384
oracle hard
nproc 16384
oracle soft
stack 10240
oracle hard
stack 32768
oracle hard
memlock 134217728
oracle soft
memlock 134217728
Create the new groups and users.
groupadd -g 54321
oinstall
groupadd -g 54322
dba
groupadd -g 54323
oper
groupadd -g 54324
backupdba
groupadd -g 54325
dgdba
groupadd -g 54326
kmdba
groupadd -g 54327
asmdba
groupadd -g 54328
asmoper
groupadd -g 54329
asmadmin
groupadd -g 54330
racdba
useradd -u 54321 -g
oinstall -G dba,oper oracle
usermod -g oinstall
-G oracle oracle
Create the directories in which the Oracle software
will be installed.
mkdir -p
/home/app/oracle/product/19.3/dbhome_1
mkdir -p /home/app/oradata
chown -R
oracle:oinstall /home/app
chmod -R 775
/home/app/oradata
Edit .bash_profile file with oracle user,
vi .bash_profile
export
ORACLE_BASE=/home/app/oracle
export
ORACLE_HOME=/home/app/oracle/product/19.3/dbhome_1
export
GRID_HOME=/home/app/grid
export
ORACLE_UNQNAME=orcl
export
ORACLE_SID=orcl
export
PATH=$ORACLE_HOME/bin:$PATH
save and exit
Download Software:
Download Oracle 19c
database software for Linux x86-64 from Oracle cloud and copy the files to
linux server (on VirtualBox) using winscp or shared folder.

You can choose "Create and configure a
single instance database" option, If you want to install database software

Select
Server class and Next.


Let's go with "Enterprise Edition":

In next screen where we choose the
Oracle base folder:

Select the directory for Oracle base. Notice
that we do not have an option to select Oracle Home and it’s preselected with
the directory where we have extracted software setup.

Select
the type of database that you want.


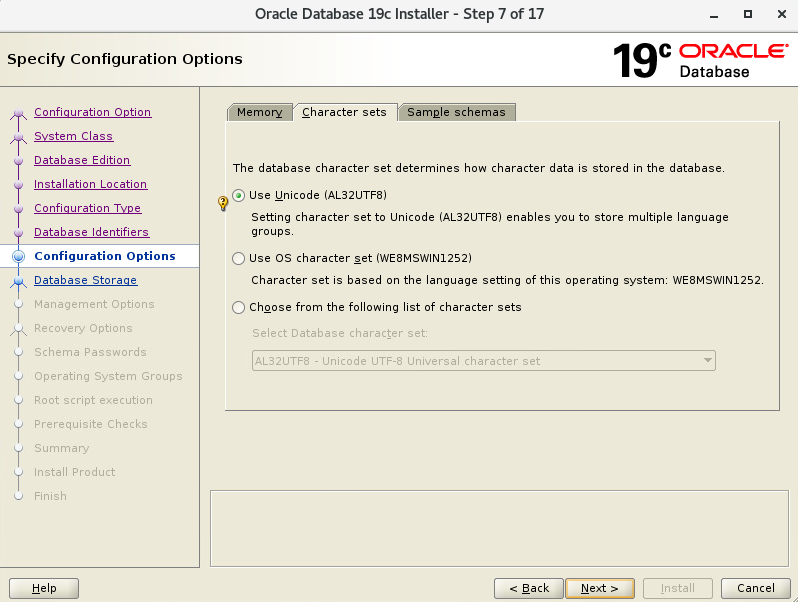

Register with EM
cloud if you the details or Click on Next.
Oracle Database 12c
is managed by Oracle Database express by default.


Select groups as per requirement and click
NEXT.


Check the installer summary and click on
Install.


Click on close.

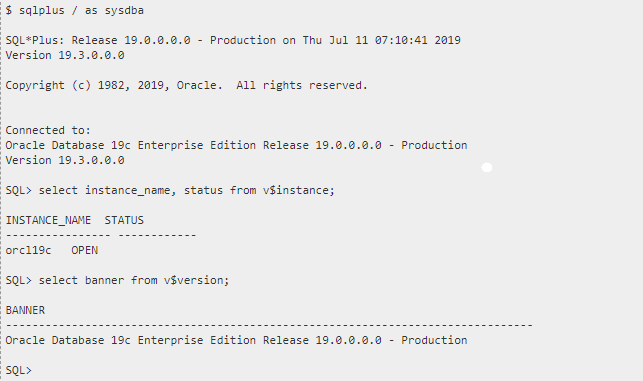
After
successful creation of database check the database status.
Saturday, February 29, 2020
How To Install Zabbix 4.4 Server On CentOS 7
Zabbix is an
open source network monitoring software designed to monitor and track the
status of various network devices, servers, and virtual machines
Update the system using below command
# yum update
Install required packages
# yum install
mariadb-server httpd -y
# yum install php php-cli php-common php-devel php-pear php-gd
php-mbstring php-mysql php-xml php-bcmath

# systemctl start httpd
Install Repository with MySQL database
# mysql_secure_installation


Install yum repository to install
Zabbix
CentOS/RHEL 7:
After
adding Zabbix apt repository in your system use following command to install
Zabbix server.
# yum install zabbix-server-mysql zabbix-web-mysql
zabbix-agent zabbix-java-gateway
Create initial database schema
# mysql -u root -p
mysql> create database zabbix character set utf8 collate
utf8_bin;
mysql> grant all privileges on zabbix.* to zabbix@localhost
identified by 'Password';
FLUSH PRIVILEGES;
mysql> quit;
Import initial schema and data. You
will be prompted to enter your newly created password.
# zcat /usr/share/doc/zabbix-server-mysql*/create.sql.gz |
mysql –u zabbix -p zabbix
Configure the database for Zabbix
server
Edit file /etc/zabbix/zabbix_server.conf
Update
the following database configurations. This will be used by Zabbix server to
connect to the database.
DBHost=localhost
DBName=zabbix
DBUser=zabbix
DBPassword=password
Configure PHP for Zabbix frontend
Edit file /etc/httpd/conf.d/zabbix.conf, uncomment and set the right
timezone for you.
# php_value date.timezone Asia/Kolkata
Start Zabbix server and agent
processes and make it start at system boot:
#
systemctl start zabbix-server zabbix-agent httpd mariadb
#
systemctl enable zabbix-server zabbix-agent httpd mariadb
Now your Zabbix server is up and
running!
Configure Zabbix frontend
Connect to your newly installed Zabbix frontend: http://server_ip_or_name/zabbix
Follow steps described in Zabbix documentation: Installing frontend
Start using Zabbix

Check for
pre-requisites
Check if you meet all the system requirements. If not configure your
php.ini.

Configure
DB Connection
Fill your DB details which you created and click
on Next Step

Zabbix
server details
This is the host and
port of running Zabbix server. As your Zabbix server is running on the same
host, so keep the values unchanged. You can give a name for your instance.

Pre-Installation
Summary
This will
give you a summary of your configuration. Click on Next Step
Install
Zabbix
Click on
Finish button to install Zabbix server

Install
Zabbix
You will see a
successful installation message on this page. This will also show you a message
for the created configuration file.

Login to
Zabbix
Login to Zabbix with following credentials
UserName : Admin
Password : Zabbix


Saturday, February 22, 2020
Creating new users with the dsadd command
Adding a new user with the dsadd command with Command Prompt

Distinguished name (DN) for the new AD object, and is required.
Cn - comman name
Dc - Domain controller
Fn - First name
In - Last name
Pwd - Password

dsadd user “cn=Tech Bir,cn=Users,dc=kb,dc=com” -samid techbir -upn techbir@kb.com -fn Tech -ln Bir -display “Tech Bir” -disabled no -pwd “PassW0rd” -mustchpwd yes
After successfully user created. You can check by find users as like below.

See users properties and all details.


Creating new users with Active Directory Administrative Center
Active Directory Administrative Center is the easiest management tool to get to grips with. You’ll need to log in to Windows Server 2016 with a domain administrator account

To run ADAC, start Server Manager by clicking the blue icon next to the Start button on the desktop taskbar. In Server Manager, select Active Directory Administrative Center from the Tools menu.

In the Active Directory Administrative Center, click Users below ad (local) in the left pane.

In the Tasks pane on the right, click New under Users, and select User from the menu.
In the Create User dialog box, Start by filling out the First name and Last name fields, and the Full name.All new users must have a Same Account Name, which is the user’s AD logon name. Enter and confirm a password, and then click OK.

The user will be required to change the password the first time they log on, and don’t forget that the password you set must meet the password complexity requirements set in domain policy.

How to create Domain user in Active Directory

Right click the folder where you want to create the new user account, select new and then click user. If you have not created additional organizational units, you can put the new account in the Users folder.

First name: Fill in user’s first name.
Initials: Fill in user’s middle initials. This can be used if there are conflicts when creating the user logon name.
Last name: Fill in user’s last name.
Full name: This will fill in automatically.

In the password and confirm password field type the user’s password, click next and finish.


This completes creating the new Active Directory user account.

At this point you may need to open the account.

Add additional information such as: Address, Profile path, Logon script, Organization details and adding the user to other Active Directory groups to provide access to additional domain resources.

Subscribe to:
Posts (Atom)