Flipkart

Showing posts with label RAID. Show all posts

Tuesday, December 18, 2018

Supermicro SuperDoctor 5 Installation steps guide

SD5 monitors target nodes hardware's system health or availability in data centers in real-time and provide alerts to administrators.

SuperDoctor® 5 Key Benefits and Features

Supports monitoring, control, and management functions.
- Hardware Monitoring: fan speed, temperature, voltage, chassis intrusion, redundant power failure, power consumption, disk health, raid health, and memory health.
- 20 Types of system information: BIOS, Baseboard, Chassis, Computer System, Disk Drives, Memory, Network, Printer, Processor, System Slot, IPMI, Power Supply, Account, Operating System, Process, Service, Share, Time Zone, OEM Strings, and System Cfg Options.

Download the setup from below link:

https://www.supermicro.com/products/nfo/SMS_SD5.cfm

clip_image001

Start the installer and proceed to next steps as per your requirements.

clip_image002

clip_image003

clip_image004

clip_image005

clip_image006

clip_image007

clip_image008

clip_image009

clip_image010

clip_image011

clip_image012

Login links : https://localhost:8444

Username : ADMIN

Password : ADMIN

clip_image013

clip_image014

Friday, June 22, 2018

MegaRAID_Storage_Manager-v16.11.00.03

Start the installation setup.

clip_image001

Click Next.

clip_image002

Accept the license and Click Next.

clip_image003

Enter the User Name and Organisation.

clip_image004

Check the installation folder location and Click Next.

clip_image005

Select the setup type.

clip_image006

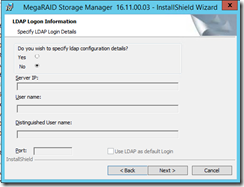
Specify the LDAP configuration details, if you have or if you have not details then click No.

clip_image007

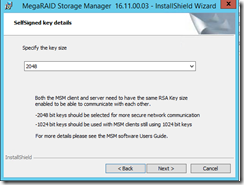
Select the key size.

clip_image008

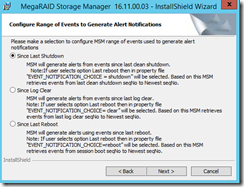
Configure notifications as per your requirement.

clip_image009

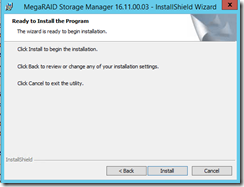
Once installed Finished.

clip_image010

Start the MegaRAID Storage Manager.

Thursday, June 21, 2018

MegaRAID_Storage_Manager-v16.11.00.03

Start the installation setup.

clip_image001

Click Next.

clip_image002

Accept the license and Click Next.

clip_image003

Enter the User Name and Organisation.

clip_image004

Check the installation folder location and Click Next.

clip_image005

Select the setup type.

clip_image006

Specify the LDAP configuration details, if you have or if you have not details then click No.

clip_image007

Select the key size.

clip_image008

Configure notifications as per your requirement.

clip_image009

Once installed Finished.

clip_image010

Start the MegaRAID Storage Manager.

RAID Alerts & Notifications

Entering or Editing the Sender Email Address and SMTP Server

MegaRAID Storage Manager (MSM) can be used to send email alerts.

To setup MSM email alerts, in MSM go to Tools-->Configure Alerts:

clip_image001

You can use the Configure Alerts window to enter or edit the sender email address and the SMTP server.

On the Configure Alerts window, click the Mail Server tab.

The Mail Server options appear, as shown in the following figure.

ConfigureAlerts

Enter a sender’s email address in the Sender email address field, or edit the existing sender email address.

Enter your SMTP server name/IP Address in the SMTP Server field, or edit the existing details.

Clear the Use Default check box to enter the desired port number in the Port field.

Click OK

The Mail Server tab looks like this:

clip_image002

Adding Email Address of Recipients of Alert Notifications

The Email tab in the Configure Alerts window shows the email addresses of the recipients of the alert notifications. The MegaRAID Storage Manager software sends alert notifications to those email addresses. Use the Configure Alerts window to add or remove email addresses of recipients and to send test messages to recipients that you add.

To add email addresses of recipients of the alert notifications, perform the following steps:

  1. Click the Email tab in the Configure Alerts window.

clip_image003

Enter the email address you want to add in the New recipient email address field.

Click Add.

The new email address appears in the Recipient email addresses field.

clip_image004

Testing Email Addresses of Recipients of Alert Notifications

Use the Email tab in the Configure Alerts window to send test messages to the email addresses that you added for

the recipients of alert notifications.

Click the Email tab on the Configure Alerts window.

The Email section of the window appears

Click an email address in the Recipient email addresses field.

Click Test.

Confirm whether the test message was sent to the email address.

A pop-up message indicates if the test message sent to the email address was successful. If the MegaRAID Storage Manager software cannot send an email message to the email address, an error message appears.

Configure RAID 5 step by step

Start the WebBIOS.

clip_image001

Select the "Configuration Wizard"

clip_image002

Choose from the following options.

clip_image003

Select Yes.

clip_image004

Now, Select the Manual Configuration.

clip_image005

Add the drives.

clip_image006

Accept and Next.

clip_image007

Click Next.

clip_image008

Add the SPAN and Click Next.

clip_image009

Click Next.

clip_image010

Choose the RAID Level. We selected the RAID 6 then select the size.

clip_image011

Update the size and accept then click Next.

clip_image012

Select Yes.

Save the Configuration.

clip_image013

clip_image014

Exit the Application. RAID is configured.